|
|
|
|
Clouds in Bryce
There are two kinds of clouds in Bryce: clouds in the environment and cloud planes.
Clouds you add to your sky interact with the light in your scene. They can block out the light of the sun and change the color of the light that hits the objects in the scene. These clouds are infinitely distant so you cannot fly through the clouds in the sky. If you want to have this effect, use a cloud plane. Sky clouds can also cast shadows on the ground below.
You can change the look of the clouds by editing the texture used to create them. By changing the texture you can alter the shape and position of the clouds within the sky.
Cloud planes are infinite planes that act as objects in your scene. They cast shadows and can interact with other objects.
Both types of clouds can be animated. The clouds in the sky can be animated by changing their color, position or frequency, and cloud planes can be animated just like other objects. They can also be animated using the Cloud Motion controls. These controls let you set parameters for automatically animating clouds. Refer to "Animating Skies" for more on animating clouds.
Adding Clouds
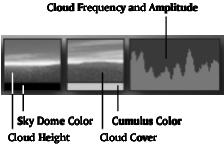
The Sky & Fog palette provides several controls that set the attributes of clouds in your sky. The Cloud Coverage, Cloud Altitude, and Cloud Frequency and Amplitude controls let you set the general appearance of your clouds. The Cloud Color sets the color of the clouds.
Use the cloud controls to set the attributes of the clouds in your scene.
You can add clouds to your scene in five easy steps:
- Select the type of cloud
- Adjust the cloud texture
- Set the cloud coverage and color
- Set cloud height
- Set the frequency and amplitude of clouds
Cloud Types
There are two types of clouds you can add to your Bryce environment: Cumulus and Stratus. Cumulus clouds are generally found at lower altitudes and appear thicker and fluffier.
The Stratus appear at higher altitudes and appear thinner and more wispy.
To add Cumulus clouds to a sky:
1 If it's not already visible, display the Sky & Fog palette by clicking the Sky & Fog button at the top of the Bryce window.
2 Click the triangle in the corner of the palette and choose Cumulus Clouds.
Cumulus clouds are thicker, darker clouds at a lower altitude. These clouds will take on tints of Sunlight color, Ambient color, or Cumulus color.
To add Stratus clouds to a sky:
1 If it's not already visible, display the Sky & Fog palette by clicking the Sky & Fog button at the top of the Bryce window.
2 Click the triangle in the corner of the palette and choose Stratus Clouds.
Stratus clouds are bright white, thin, clean clouds that appear at high altitudes. These clouds are very responsive to Sunlight color and Sky Dome color, and less responsive to Cumulus color or Ambient color.
You can also choose both cloud types, or neither. Selecting neither cloud type creates a clear sky.
Editing Cloud Textures
Clouds in Bryce are created using a procedural texture with a cloud pattern. The color, position, size, and pattern within the texture determines the final look of the cloud in your sky. You can edit this texture using either the Sky Lab palette, or for more complex editing, you can use the Texture Editor.
The texture used for a cloud can come from either the Bryce texture library or you can create your own.
To edit cloud texture in the Sky Lab dialog:
1 If it's not already visible, display the Sky & Fog palette by clicking the Sky & Fog button at the top of the Bryce window.
2 Click the Sky Lab button. The Sky Lab palette appears.
4 Click the grey + or - Turbulence buttons to increase or decrease the amount of noise in the texture.
5 Click the blue + or - Complexity buttons to increase or decrease the amount of detail in the texture.
6 Click the Reset button to restore the original settings, if you want to start over.
7 Click the OK icon to apply your changes.
To edit cloud textures in the Deep Texture Editor:
1 If it's not already visible, display the Sky & Fog palette by clicking the Sky & Fog button at the top of the Bryce window.
2 Click the Sky Lab button. The Sky Lab palette appears.
4 Click the Edit button below the type of clouds you want to edit.
5 Click the Edit button. The Deep Texture Editor appears.
The cloud texture and its components appear in the component windows.
If you're not familiar with using the Deep Texture Editor you may get some very unpredictable results which may result in clouds that don't look much like clouds. Before you start editing the clouds texture you may want to refer to"Creating and Editing Textures" for more instruction on how to use the editor.
6 If you want to add additional turbulence to the cloud texture, adjust the texture's Noise:
- Click the Noise button at the bottom of the editor. The Noise control appears.
The Noise control lets you adjust the frequency of the noise in any of the texture's components.- At the top of the Noise control, click the button associated with the component you want to edit.
- Adjust the Noise slider to increase/decrease the frequency of the noise in the texture.
7 If you want to change the colors of a component, click one of the color indicators in the component window and choose a new color.
8 If you want to add more complexity to the texture, adjust its Phase:
- Click the Phase button at the bottom of the editor. The Phase control appears.
The Phase control lets you adjust the amplitude of the phase in any of the texture's components.- At the top of the Phase control, click the button associated with the component you want to edit.
- Adjust the Phase slider to increase/decrease the amplitude of the phase.
9 If you want to change the pattern in the texture, apply a filter:
- Click the Filter button at the bottom of the editor. The Filtering control appears.
The Filtering control displays a graphical representation of the filter applied to your texture. By changing the equation of the filter to the value of the variables, you can change the patterns within the cloud texture.- At the top of the Filtering control, click the button associated with the component you want to edit.
- Change the filter equation and variable values to adjust the filter applied to your texture.
Filtering is a rather complex operation. Try experimenting with different equations and see what happens.
10 Click the OK icon to exit the editor.
Cloud Cover
Cloud Cover controls the quantity of clouds you can see in the sky. A high coverage means that there is a very dense cloud layer, and a low setting means that there are very few clouds in the sky.
Cloud cover also indirectly controls the brightness of the environment. The more cloud coverage you have in a sky, the darker the environment, since less sunlight can pass through the clouds.
Adjusting cloud coverage changes the quantity of clouds but not the frequency. You can think of it as adjusting the volume on a radio without changing the station.
To set cloud coverage:
1 If it's not already visible, display the Sky & Fog palette by clicking the Sky & Fog button at the top of the Bryce window.
2 Drag left or right inside the Cloud Coverage control thumbnail. Drag left to decrease coverage and right to increase it.
To set cloud coverage numerically:
1 If it's not already visible, display the Sky & Fog palette by clicking the Sky & Fog button at the top of the Bryce window.
2 Click the Sky Lab button. The Sky Lab dialog appears.
4 Drag the slider or enter a value in the Cloud Cover field.
To set cloud color:
1 Display the Sky & Fog palette by clicking the Sky & Fog button.
2 Click the color swatch beneath the Cloud Coverage thumbnail and choose a color from the color picker.
Cloud Height
The height of your clouds has an impact on the appearance of your sky. Greater heights will result in smaller, more distant cloud formations, as well as a thicker band of haze at the horizon. Lower heights result in larger, more languorous cloud formations and a thinner band of haze at the horizon.
There are two things to remember when working with this control. First, the Cloud Height will affect the size of your Haze band, if you have a haze setting greater than zero. The higher the altitude, the wider the haze region will be on the horizon. Second, remember to lower your altitude setting if you are creating a nighttime scene. Since high altitudes increase the size of the horizon Haze region, the sky will be too unnaturally bright for realistic night scenes.
To set cloud height:
1 If it's not already visible, display the Sky & Fog palette by clicking Sky & Fog on the menu bar.
2 Drag horizontally inside the Cloud Height control thumbnail. Drag left to decrease altitude and right to increase it.
To set cloud height numerically:
1 Display the Sky & Fog palette by clicking the Sky & Fog text button.
2 Click the Sky Lab button. The Sky Lab dialog appears.
4 Drag the slider or enter a value in the Cloud Height field.
Frequency and Amplitude
The Frequency and Amplitude control lets you set the types of cloud formation you'll see in your sky. By combining these two controls you can change your clouds from light and fluffy to dark and brooding.
To set Cloud Frequency and Amplitude:
1 Display the Sky & Fog palette by clicking the Sky & Fog button at the top of the Bryce window.
2 In the Cloud Frequency and Amplitude control, drag horizontally to control the frequency of your cloud formations.
Drag right, and the "spikes" will get closer together, resulting in smaller formations. Drag left for larger, more luxurious formations.
The Text Display area shows you the numerical value of the amplitude as you drag.
3 Drag vertically to control the amplitude of your cloud formations.
Drag away from the horizontal center, and the spikes increase in height, resulting in formations with harder edges. Drag toward the horizontal center for softer-edged formations.
Note: It is possible to invert the spikes. This means that you can exchange positive and negative spaces in your sky. If you invert the amplitude, everything that was previously clear sky will be clouds, while everything that was cloud will be clear sky.
To set Frequency and Amplitude numerically:
1 If it's not already visible, display the Sky & Fog palette by clicking the text item on the menu bar.
2 Click the Sky Lab button. The Sky Lab dialog appears.
4 Drag the slider or enter a value in the Frequency field. The Frequency field controls the frequency (scale) of cloud formations in your scene.
5 Drag the slider or enter a value in the Amplitude field. The Amplitude field controls the amplitude (edge softness) of clouds in your scene.
Sky Dome Color
Sky Dome Color lets you create a color wash over your scenes, even if there is no sunlight present. This color simulates the natural effect that occurs when you have color in the sky even though the sun has set. Sky Dome Color lets you create late afternoon or evening scenes.
For late afternoon and early evening realism, try using a touch of orange or yellow. This will create a cast of color over your entire scene, regardless of the position or color of the sun or moon.
To set Sky Dome color:
1 If it's not already visible, display the Sky & Fog palette by clicking the text item on the menu bar.
2 Click the color bar beneath the Cloud Height control thumbnail and choose a color from the color picker.
Linking Clouds to the Camera View
If you move the camera view during an animation, the clouds in your environment will appear to zoom by, creating a kind of time-lapsed effect. If you want the clouds to appear fixed as you move the camera, link the cloud in the sky to the camera view. This way, wherever the camera moves the clouds will follow, so that they seem to remain stationary.
To link clouds to view:
1 If it's not already visible, display the Sky & Fog palette by clicking the text item on the menu bar.
2 Click the Sky Lab button. The Sky Lab dialog appears.
4 Click the Link Clouds to View button.
Refer to "Animating Skies" for more on animating skies.
Using a Fixed Cloud Plane
As you move higher up in a Bryce environment, the cloud pattern shifts, so that it appears as if you're getting closer to the clouds. If you want to counter this effect, you can use the Fix Cloud Plane option to freeze the cloud pattern so that it doesn't change as you move higher up.
To use a fixed cloud pattern in your sky:
1 If it's not already visible, display the Sky & Fog palette by clicking the text item on the menu bar.
2 Click the Sky Lab button. The Sky Lab dialog appears.
4 Click the Fixed Cloud Plane button.
Setting the Cloud Motion
You can set the speed and turbulence of clouds as well as specify the direction of motion.
To set cloud speed:
1 If it's not already visible, display the Sky & Fog palette by clicking the text item on the menu bar.
2 Click the Sky Lab button. The Sky Lab dialog appears.
4 Drag the slider, or enter a number in the Speed field.
To set cloud turbulence:
1 If it's not already visible, display the Sky & Fog palette by clicking the text item on the menu bar.
2 Click the Sky Lab button. The Sky Lab dialog appears.
4 Drag the slider or enter a value in the Turbulence field.
To set the direction of motion:
1 If it's not already visible, display the Sky & Fog palette by clicking the text item on the menu bar.
2 Click the Sky Lab button. The Sky Lab dialog appears.
4 Drag the Cloud motion control to specify the angle of motion.
 Corel Corporation http://www.corel.com Voice: (800) 772-6735 Fax: (716) 447-7366 www.corel.com/support |